Thursday, January 29, 2009
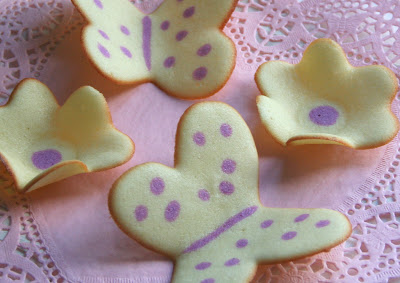
 This month's challenge is from Karen of Bake My Day and Zorra of 1x umruehren bitte aka Kochtopf. They have chosen Tuiles from The Chocolate Book by Angélique Schmeink and Nougatine and Chocolate Tuiles from Michel Roux.
Tuiles from “The Chocolate Book”, written by female Dutch Master chef Angélique Schmeinck.
Cover the bowl with plastic wrap and chill in the fridge for at least 30 minutes to firm up. (This batter will keep in the fridge for up to a week, take it out 30 minutes before you plan to use it).


The name 'tuile' is a french word meaning 'tile,' and when presented in rows are supposed to resemble the curved tiles on the tops of buildings. In their traditional form, a tuile (petit four style cookie) is a flat cookie which has been set over a curved surface while freshly baked and allowed to cool, giving its characteristic curved-tile shape.
Recipe:
Yields: 20 small butterflies or shape of choice or 6 large Preparation time batter 10 minutes, waiting time 30 minutes, baking time: 5-10 minutes per batch
65 grams / ¼ cup / 2.3 ounces softened butter (not melted but soft)
60 grams / ½ cup / 2.1 ounces sifted confectioner’s sugar
1 sachet vanilla sugar (7 grams or substitute with a dash of vanilla extract)
2 large egg whites (slightly whisked with a fork)
65 grams / 1/2 cup / 2.3 ounces sifted all purpose flour
1 table spoon cocoa powder/or food coloring of choice ( I used India Natural Dyes)
Butter/spray to grease baking sheet or SILPAT
Oven: 180C / 350F
Using a hand whisk or a stand mixer fitted with the paddle (low speed) and cream butter, sugar and vanilla to a paste. Keep stirring while you gradually add the egg whites. Continue to add the flour in small batches and stir to achieve a homogeneous and smooth batter/paste. Be careful to not over mix.
Cover the bowl with plastic wrap and chill in the fridge for at least 30 minutes to firm up. (This batter will keep in the fridge for up to a week, take it out 30 minutes before you plan to use it).
Line a baking sheet with parchment paper or Silpat, grease with either butter/spray and chill in the fridge for at least 15 minutes. This will help spread the batter more easily if using a stencil/cardboard template such as the butterfly. Press the stencil on the baking sheet and use an off sided spatula to spread batter. Leave some room in between your shapes.

I used some cardboard cake rounds I had to make my stencils.
Mix a small part of the batter with the cocoa and a few drops of warm water or food coloring until evenly colored. Use this colored batter in a paper piping bag and proceed to pipe decorations on the wings and body of the butterfly.
Bake butterflies in a preheated oven (180C/350F) for about 5-10 minutes or until the edges turn golden brown. Immediately release from baking sheet and proceed to shape/bend the cookies in the desired shape. These cookies have to be shaped when still warm, you might want to bake a small amount at a time. Or: place a baking sheet toward the front of the warm oven, leaving the door half open. The warmth will keep the cookies malleable. If you don’t want to do stencil shapes, you might want to transfer the batter into a piping bag fitted with a small plain tip. Pipe the desired shapes and bake. Shape immediately after baking using for instance a rolling pin, a broom handle, cups, cones….


RASPBERRY WHITE CHOCOLATE MOUSSE

Raspberry White Chocolate Mousse
INGREDIENTS:
1 (10 ounce) package frozen raspberries,
thawed
2 tablespoons white sugar
2 tablespoons orange liqueur
1 3/4 cups heavy whipping cream
6 ounces white chocolate, chopped
DIRECTIONS:1.Process berries in a blender or food processor until smooth. Strain mixture into a small bowl, and discard seeds. Add the sugar and liqueur, and stir until sugar dissolves. Makes 1 cup of sauce.
2.In a heavy saucepan on low heat, warm 1/4 cup of the cream and the white chocolate, stirring constantly until chocolate melts. Let mixture cool until it is lukewarm. Stir in 1 Tablespoon of the raspberry sauce (or more) and transfer to a large bowl.
3.In a medium bowl, whip remaining 1 1/2 cup cream to soft peaks. Fold into melted chocolate mixture, one-third at a time, until no streaks remain.
4. Combine together OR layer into parfait dishes, and serve with the sauce. May also be used to fill or ice a cake


