Showing posts with label Desserts. Show all posts

Babycakes NYC Allergen-Free Chocolate Chip Cookies

Saturday, May 16, 2009


This chocolate chip cookie recipe is from the new Babycakes cookbook.  They are ooey, gooey and soft in the middle, and slightly crisp on the edges! :)  We LOVED them!


The raw cookie dough is awesome. I couldn't stop eating it... and there are no eggs to worry about, another reason to keep right on eating it.  I want to save some dough and roll it into little balls and freeze and then add then add them to some homemade coconut vanilla ice cream to make cookie dough ice cream.  

Chocolate Chip Cookies
(Babycakes by Erin McKenna, 2009)

1 cup coconut oil, melted and cooled
6 tablespoons prepared unsweetened applesauce
1 teaspoon salt
2 tablespoons pure vanilla extract
1 1/4 cups evaporated cane juice
2 cups Bob's Red Mill gluten-free all-purpose baking flour
1/4 cup flax meal
1 teaspoon baking soda
1 1/2 teaspoons xanthan gum
1 cup vegan chocolate chips

Directions

Preheat oven with a rack set in the center to 325 degrees. Line 2 baking sheets with parchment paper; set aside. In a medium bowl, mix together oil, applesauce, salt, vanilla, and evaporated cane juice. In another medium bowl, whisk together flour, flax meal, baking soda, and xanthan gum. Using a rubber spatula, add the dry ingredients to the wet mixture and stir until a grainy dough is formed. Gently fold in the chocolate chips just until they are evenly distributed throughout the dough. Use a 2-inch ice cream scoop to make evenly sized dough pieces and place onto prepared baking sheets, 1 inch apart. Gently press down on each cookie with the heel of your hand. Transfer cookies to oven and bake until edges are crisp but cookie is still soft in the center, about 15 minutes, rotating baking sheets after 9 minutes. Let cookies stand on baking sheets for 10 minutes before transferring to a wire rack to cool. Cooled cookies may be kept in an airtight container for up to 3 days.


Owl Cake

Friday, April 3, 2009


I love cake and everything about it!  "Cake just makes people happy!"  It sure does me!

This cake is the first cake I made in cake decorating class. I made an owl cake because owls and cake are a few of my favorite things! The cake is a yellow cake with all butter, butter cream frosting...Some bakeries sell frosting shots ...I can see why!


Butter Cream Frosting
1 ½ Cups Salted Butter at room temperature
2 Teaspoons Pure Vanilla Extract
6 Cups Sifted Confectioners’ sugar
2-8 Tablespoons milk, depending on desired consistency

Cream butter with electric mixer. Add vanilla. Gradually add sugar, one cup at a time, beating well on medium speed. Scrape sides and bottom of bowl often. When all the sugar has been mixed in, icing will appear dry. Add milk and beat at medium speed until light and fluffy. Keep icing covered with a damp cloth until ready to use. For best results, keep icing bowl in refrigerator when not in use. Refrigerate in an airtight container. Re-whip before using. Store frosted cake in refrigerator. Remove cake from refrigerator an hour or more before serving or until cake is close to room temperature.


January Daring Bakers' Challenge: Tuiles!

Thursday, January 29, 2009

This month's challenge is from Karen of Bake My Day and Zorra of 1x umruehren bitte aka Kochtopf. They have chosen Tuiles from The Chocolate Book by Angélique Schmeink and Nougatine and Chocolate Tuiles from Michel Roux.
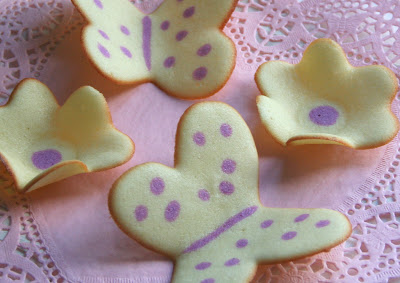
I chose butterflies and flowers and I made a Raspberry White Chocolate Mousse to go with them. I loved the Tuiles. They were really fun to make. I will definately make them again.

Tuiles from “The Chocolate Book”, written by female Dutch Master chef Angélique Schmeinck.

The name 'tuile' is a french word meaning 'tile,' and when presented in rows are supposed to resemble the curved tiles on the tops of buildings. In their traditional form, a tuile (petit four style cookie) is a flat cookie which has been set over a curved surface while freshly baked and allowed to cool, giving its characteristic curved-tile shape.

Recipe:
Yields: 20 small butterflies or shape of choice or 6 large Preparation time batter 10 minutes, waiting time 30 minutes, baking time: 5-10 minutes per batch

65 grams / ¼ cup / 2.3 ounces softened butter (not melted but soft)
60 grams / ½ cup / 2.1 ounces sifted confectioner’s sugar
1 sachet vanilla sugar (7 grams or substitute with a dash of vanilla extract)
2 large egg whites (slightly whisked with a fork)
65 grams / 1/2 cup / 2.3 ounces sifted all purpose flour
1 table spoon cocoa powder/or food coloring of choice ( I used India Natural Dyes)
Butter/spray to grease baking sheet or SILPAT

Oven: 180C / 350F

Using a hand whisk or a stand mixer fitted with the paddle (low speed) and cream butter, sugar and vanilla to a paste. Keep stirring while you gradually add the egg whites. Continue to add the flour in small batches and stir to achieve a homogeneous and smooth batter/paste. Be careful to not over mix.

Cover the bowl with plastic wrap and chill in the fridge for at least 30 minutes to firm up. (This batter will keep in the fridge for up to a week, take it out 30 minutes before you plan to use it).

Line a baking sheet with parchment paper or Silpat, grease with either butter/spray and chill in the fridge for at least 15 minutes. This will help spread the batter more easily if using a stencil/cardboard template such as the butterfly. Press the stencil on the baking sheet and use an off sided spatula to spread batter. Leave some room in between your shapes.

I used some cardboard cake rounds I had to make my stencils.

Mix a small part of the batter with the cocoa and a few drops of warm water or food coloring until evenly colored. Use this colored batter in a paper piping bag and proceed to pipe decorations on the wings and body of the butterfly.

Bake butterflies in a preheated oven (180C/350F) for about 5-10 minutes or until the edges turn golden brown. Immediately release from baking sheet and proceed to shape/bend the cookies in the desired shape. These cookies have to be shaped when still warm, you might want to bake a small amount at a time. Or: place a baking sheet toward the front of the warm oven, leaving the door half open. The warmth will keep the cookies malleable. If you don’t want to do stencil shapes, you might want to transfer the batter into a piping bag fitted with a small plain tip. Pipe the desired shapes and bake. Shape immediately after baking using for instance a rolling pin, a broom handle, cups, cones….


RASPBERRY WHITE CHOCOLATE MOUSSE

Raspberry White Chocolate Mousse
INGREDIENTS:
1 (10 ounce) package frozen raspberries,
thawed
2 tablespoons white sugar
2 tablespoons orange liqueur
1 3/4 cups heavy whipping cream
6 ounces white chocolate, chopped

DIRECTIONS:1.Process berries in a blender or food processor until smooth. Strain mixture into a small bowl, and discard seeds. Add the sugar and liqueur, and stir until sugar dissolves. Makes 1 cup of sauce.

2.In a heavy saucepan on low heat, warm 1/4 cup of the cream and the white chocolate, stirring constantly until chocolate melts. Let mixture cool until it is lukewarm. Stir in 1 Tablespoon of the raspberry sauce (or more) and transfer to a large bowl.

3.In a medium bowl, whip remaining 1 1/2 cup cream to soft peaks. Fold into melted chocolate mixture, one-third at a time, until no streaks remain.

4. Combine together OR layer into parfait dishes, and serve with the sauce. May also be used to fill or ice a cake

Pear Torte

Tuesday, January 6, 2009

Gluten-Free Vegan Pear Torte

This recipe is from The Gluten-Free Vegan cookbook by Susan O'Brian.  Every recipe I've tried from her cookbook has turned out great.  This torte was delicious. I made it for New Year's Eve and everyone loved it, allergy-sensitive and not. I used Comice pears.

Pear Torte
(The Gluten-Free Vegan by Susan O’Brien)


Crust½ Cup Vegan Margarine
1/3 Cup Agave Nectar
¼ teaspoon Vanilla Extract
¾ cup Sorghum Flour
2/3 cup Chopped Walnuts

Filling
1 (8-ounce) Tub Tofutti Soy Cream Cheese
1 Tablespoon Tofutti Soy Sour Cream
1 Egg or 1 ½ Teaspoons Ener-G Egg Replacer whisked together with 2 Tablespoons Warm Water
½ Teaspoon Vanilla Extract
1/8 Cup Agave Nectar
1 Pound Pears, peeled, cored and sliced
Ground Cinnamon, for sprinkling

Preheat the oven to 350 degrees F. Lightly grease a 9-inch square baking pan or dish or (I used my quiche plate) with vegetable oil.

Prepare the crust: Beat the margarine with the agave nectar until creamy. Add the rest of the crust ingredients. Stir to blend together well. Spread in the prepared pan and bake for 15-18 minutes, or until set. Let cool while you make the filling.

For the filling: In a large mixing bowl, beat all the filling ingredients together (except the pears and cinnamon) until well blended. Pour over the cooled crust. Arrange the sliced pears on top of the filling. Sprinkle generously with cinnamon.

Bake at 350 degrees until set, 20 to 30 minutes. Cool on wire rack. Store in refridgerator after cooled. Tastes just a great or better the next day.