Owl Cake
Friday, April 3, 2009
I love cake and everything about it! "Cake just makes people happy!" It sure does me!
This cake is the first cake I made in cake decorating class. I made an owl cake because owls and cake are a few of my favorite things! The cake is a yellow cake with all butter, butter cream frosting...Some bakeries sell frosting shots ...I can see why!
Butter Cream Frosting
1 ½ Cups Salted Butter at room temperature
2 Teaspoons Pure Vanilla Extract
6 Cups Sifted Confectioners’ sugar
2-8 Tablespoons milk, depending on desired consistency
Cream butter with electric mixer. Add vanilla. Gradually add sugar, one cup at a time, beating well on medium speed. Scrape sides and bottom of bowl often. When all the sugar has been mixed in, icing will appear dry. Add milk and beat at medium speed until light and fluffy. Keep icing covered with a damp cloth until ready to use. For best results, keep icing bowl in refrigerator when not in use. Refrigerate in an airtight container. Re-whip before using. Store frosted cake in refrigerator. Remove cake from refrigerator an hour or more before serving or until cake is close to room temperature.
2 Teaspoons Pure Vanilla Extract
6 Cups Sifted Confectioners’ sugar
2-8 Tablespoons milk, depending on desired consistency
Cream butter with electric mixer. Add vanilla. Gradually add sugar, one cup at a time, beating well on medium speed. Scrape sides and bottom of bowl often. When all the sugar has been mixed in, icing will appear dry. Add milk and beat at medium speed until light and fluffy. Keep icing covered with a damp cloth until ready to use. For best results, keep icing bowl in refrigerator when not in use. Refrigerate in an airtight container. Re-whip before using. Store frosted cake in refrigerator. Remove cake from refrigerator an hour or more before serving or until cake is close to room temperature.
Posted by Monica at 11:37 AM 2 comments
February Daring Bakers' Challenge: Flourless Chocolate Valentino Cake
Saturday, February 28, 2009
Chocolate Valentino cake by Chef Wan
This is a Flourless Chocolate Valentino for my Valentine. I made it gluten-free and dairy-free by replacing the butter with Earth Balance Soy-free Margarine. I used Callebaut (54% cocoa) semisweet chocolate. I dusted the top with powdered sugar using a doily I had of my grandmother's to make a design. Thanks Grammie! And thanks Mom for the pretty plate for Valentine's day.
To go with the cake, I made a Vegan Vanilla Bean Ice Cream from Vegan Ice Cream Paradise (this blog is GREAT). It was awesome and went really well with the rich, fudgy cake.
Chocolate Valentino
Preparation Time: 20 minutes
NOTES:
* Use your favorite chocolate –
* A higher cocoa percentage increases the bitterness of the chocolate.
* Equipment - it is optional to use a heart shaped pan. For a real Valentino, bake it in a heart shaped pan or cut it out into a heart shape. You may use any shape pan that gives you an area of 50” - 6x8 or 7x7. An 8” spring form pan works with great results as do smaller pans or ramekins.
* An instant read thermometer highly recommended.
NOTES:
* Use your favorite chocolate –
* A higher cocoa percentage increases the bitterness of the chocolate.
* Equipment - it is optional to use a heart shaped pan. For a real Valentino, bake it in a heart shaped pan or cut it out into a heart shape. You may use any shape pan that gives you an area of 50” - 6x8 or 7x7. An 8” spring form pan works with great results as do smaller pans or ramekins.
* An instant read thermometer highly recommended.
* This is a very decadent cake that will sink a little as it cools but will still hold its shape. A very dense and fudgy cake that tastes divine. The top forms a light crust kind of like a brownie
RECIPE:
RECIPE:
- 16 ounces (1 pound) (454 grams) of semisweet chocolate, roughly chopped - I used Callebaut (54% cocoa) semisweet chocolate.
- 1/2 cup (1 stick) plus 2 tablespoons (146 grams total) of unsalted butter. To make it dairy-free, I replaced the butter with Earth Balance Soy Margarine
- 5 large eggs separated
1. Put chocolate and butter in a heatproof bowl and set over a pan of simmering water (the bottom of the bowl should not touch the water) and melt, stirring often.
2. While your chocolate butter mixture is cooling. Butter your pan and line with a parchment circle then butter the parchment.
3. Separate the egg yolks from the egg whites and put into two medium/large bowls.
4. Whip the egg whites in a medium/large grease free bowl until stiff peaks are formed (do not over-whip or the cake will be dry).
5. With the same beater beat the egg yolks together.
6. Add the egg yolks to the cooled chocolate.
7. Fold in 1/3 of the egg whites into the chocolate mixture and follow with remaining 2/3rds. Fold until no white remains without deflating the batter. {link of folding demonstration}
8. Pour batter into prepared pan, the batter should fill the pan 3/4 of the way full, and bake at 375F/190C
9. Bake for 25 minutes until an instant read thermometer reads 140F/60C. Note – If you do not have an instant read thermometer, the top of the cake will look similar to a brownie and a cake tester will appear wet.
10. Cool cake on a rack for 10 minutes then unmold.
Vegan Vanilla Bean Ice Cream
2 c. soy creamer (or any non-dairy milk)2 c. soy milk (or any non-dairy milk)
1 vanilla bean
¾ c. sugar
2 T. arrowroot
Mix ¼ cup of soy milk with the 2 tablespoons of arrowroot and set aside. Mix the soy creamer and soy milk together in a saucepan. Slit the vanilla bean lengthwise, and scrape the seeds into the milk. Drop the bean shell into the milk too. Bring to a slight boil, then lower the temperature and simmer very gently for about 30 minutes. Remove the vanilla bean shell. Stir in the sugar, and bring to a boil again. When the mixture has just started to boil, take off the heat and stir in the arrowroot slurry. This should immediately cause the liquid to thicken (not a lot, but a noticeable amount; it will be thicker when it cools). Set the ice cream mixture aside to cool. Freeze according to your ice cream maker’s instructions.
Posted by Monica at 6:38 AM 1 comments
Labels: Cakes, Daring Bakers, Gluten-Free Dairy-Free Soy-Free, Ice Cream, Vegan (ice cream)
January Daring Bakers' Challenge: Tuiles!
Thursday, January 29, 2009
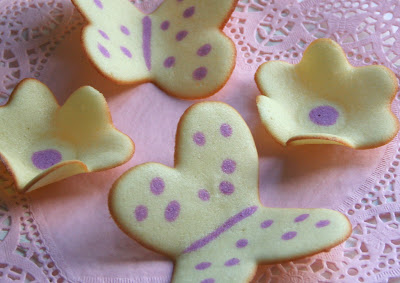
Tuiles from “The Chocolate Book”, written by female Dutch Master chef Angélique Schmeinck.
Cover the bowl with plastic wrap and chill in the fridge for at least 30 minutes to firm up. (This batter will keep in the fridge for up to a week, take it out 30 minutes before you plan to use it).

The name 'tuile' is a french word meaning 'tile,' and when presented in rows are supposed to resemble the curved tiles on the tops of buildings. In their traditional form, a tuile (petit four style cookie) is a flat cookie which has been set over a curved surface while freshly baked and allowed to cool, giving its characteristic curved-tile shape.
Recipe:
Yields: 20 small butterflies or shape of choice or 6 large Preparation time batter 10 minutes, waiting time 30 minutes, baking time: 5-10 minutes per batch
65 grams / ¼ cup / 2.3 ounces softened butter (not melted but soft)
60 grams / ½ cup / 2.1 ounces sifted confectioner’s sugar
1 sachet vanilla sugar (7 grams or substitute with a dash of vanilla extract)
2 large egg whites (slightly whisked with a fork)
65 grams / 1/2 cup / 2.3 ounces sifted all purpose flour
1 table spoon cocoa powder/or food coloring of choice ( I used India Natural Dyes)
Butter/spray to grease baking sheet or SILPAT
Oven: 180C / 350F
Using a hand whisk or a stand mixer fitted with the paddle (low speed) and cream butter, sugar and vanilla to a paste. Keep stirring while you gradually add the egg whites. Continue to add the flour in small batches and stir to achieve a homogeneous and smooth batter/paste. Be careful to not over mix.
Cover the bowl with plastic wrap and chill in the fridge for at least 30 minutes to firm up. (This batter will keep in the fridge for up to a week, take it out 30 minutes before you plan to use it).
Line a baking sheet with parchment paper or Silpat, grease with either butter/spray and chill in the fridge for at least 15 minutes. This will help spread the batter more easily if using a stencil/cardboard template such as the butterfly. Press the stencil on the baking sheet and use an off sided spatula to spread batter. Leave some room in between your shapes.
I used some cardboard cake rounds I had to make my stencils.
Mix a small part of the batter with the cocoa and a few drops of warm water or food coloring until evenly colored. Use this colored batter in a paper piping bag and proceed to pipe decorations on the wings and body of the butterfly.
Bake butterflies in a preheated oven (180C/350F) for about 5-10 minutes or until the edges turn golden brown. Immediately release from baking sheet and proceed to shape/bend the cookies in the desired shape. These cookies have to be shaped when still warm, you might want to bake a small amount at a time. Or: place a baking sheet toward the front of the warm oven, leaving the door half open. The warmth will keep the cookies malleable. If you don’t want to do stencil shapes, you might want to transfer the batter into a piping bag fitted with a small plain tip. Pipe the desired shapes and bake. Shape immediately after baking using for instance a rolling pin, a broom handle, cups, cones….
RASPBERRY WHITE CHOCOLATE MOUSSE
Raspberry White Chocolate Mousse
INGREDIENTS:
1 (10 ounce) package frozen raspberries,
thawed
2 tablespoons white sugar
2 tablespoons orange liqueur
1 3/4 cups heavy whipping cream
6 ounces white chocolate, chopped
DIRECTIONS:1.Process berries in a blender or food processor until smooth. Strain mixture into a small bowl, and discard seeds. Add the sugar and liqueur, and stir until sugar dissolves. Makes 1 cup of sauce.
2.In a heavy saucepan on low heat, warm 1/4 cup of the cream and the white chocolate, stirring constantly until chocolate melts. Let mixture cool until it is lukewarm. Stir in 1 Tablespoon of the raspberry sauce (or more) and transfer to a large bowl.
3.In a medium bowl, whip remaining 1 1/2 cup cream to soft peaks. Fold into melted chocolate mixture, one-third at a time, until no streaks remain.
4. Combine together OR layer into parfait dishes, and serve with the sauce. May also be used to fill or ice a cake
1 (10 ounce) package frozen raspberries,
thawed
2 tablespoons white sugar
2 tablespoons orange liqueur
1 3/4 cups heavy whipping cream
6 ounces white chocolate, chopped
DIRECTIONS:1.Process berries in a blender or food processor until smooth. Strain mixture into a small bowl, and discard seeds. Add the sugar and liqueur, and stir until sugar dissolves. Makes 1 cup of sauce.
2.In a heavy saucepan on low heat, warm 1/4 cup of the cream and the white chocolate, stirring constantly until chocolate melts. Let mixture cool until it is lukewarm. Stir in 1 Tablespoon of the raspberry sauce (or more) and transfer to a large bowl.
3.In a medium bowl, whip remaining 1 1/2 cup cream to soft peaks. Fold into melted chocolate mixture, one-third at a time, until no streaks remain.
4. Combine together OR layer into parfait dishes, and serve with the sauce. May also be used to fill or ice a cake
Posted by Monica at 1:03 PM 4 comments
Labels: Cookies, Daring Bakers, Desserts
Pear Torte
Tuesday, January 6, 2009
Gluten-Free Vegan Pear Torte
This recipe is from The Gluten-Free Vegan cookbook by Susan O'Brian. Every recipe I've tried from her cookbook has turned out great. This torte was delicious. I made it for New Year's Eve and everyone loved it, allergy-sensitive and not. I used Comice pears.
Pear Torte
(The Gluten-Free Vegan by Susan O’Brien)
Crust½ Cup Vegan Margarine
1/3 Cup Agave Nectar
¼ teaspoon Vanilla Extract
¾ cup Sorghum Flour
2/3 cup Chopped Walnuts
Filling
1 (8-ounce) Tub Tofutti Soy Cream Cheese
1 Tablespoon Tofutti Soy Sour Cream
1 Egg or 1 ½ Teaspoons Ener-G Egg Replacer whisked together with 2 Tablespoons Warm Water
½ Teaspoon Vanilla Extract
1/8 Cup Agave Nectar
1 Pound Pears, peeled, cored and sliced
Ground Cinnamon, for sprinkling
Preheat the oven to 350 degrees F. Lightly grease a 9-inch square baking pan or dish or (I used my quiche plate) with vegetable oil.
Prepare the crust: Beat the margarine with the agave nectar until creamy. Add the rest of the crust ingredients. Stir to blend together well. Spread in the prepared pan and bake for 15-18 minutes, or until set. Let cool while you make the filling.
For the filling: In a large mixing bowl, beat all the filling ingredients together (except the pears and cinnamon) until well blended. Pour over the cooled crust. Arrange the sliced pears on top of the filling. Sprinkle generously with cinnamon.
Bake at 350 degrees until set, 20 to 30 minutes. Cool on wire rack. Store in refridgerator after cooled. Tastes just a great or better the next day.
Pear Torte
(The Gluten-Free Vegan by Susan O’Brien)
Crust½ Cup Vegan Margarine
1/3 Cup Agave Nectar
¼ teaspoon Vanilla Extract
¾ cup Sorghum Flour
2/3 cup Chopped Walnuts
Filling
1 (8-ounce) Tub Tofutti Soy Cream Cheese
1 Tablespoon Tofutti Soy Sour Cream
1 Egg or 1 ½ Teaspoons Ener-G Egg Replacer whisked together with 2 Tablespoons Warm Water
½ Teaspoon Vanilla Extract
1/8 Cup Agave Nectar
1 Pound Pears, peeled, cored and sliced
Ground Cinnamon, for sprinkling
Preheat the oven to 350 degrees F. Lightly grease a 9-inch square baking pan or dish or (I used my quiche plate) with vegetable oil.
Prepare the crust: Beat the margarine with the agave nectar until creamy. Add the rest of the crust ingredients. Stir to blend together well. Spread in the prepared pan and bake for 15-18 minutes, or until set. Let cool while you make the filling.
For the filling: In a large mixing bowl, beat all the filling ingredients together (except the pears and cinnamon) until well blended. Pour over the cooled crust. Arrange the sliced pears on top of the filling. Sprinkle generously with cinnamon.
Bake at 350 degrees until set, 20 to 30 minutes. Cool on wire rack. Store in refridgerator after cooled. Tastes just a great or better the next day.
Posted by Monica at 6:30 AM 1 comments
Labels: Desserts, Gluten-Free, Vegan
Allergen-Free Cinnamon Toasty Bread
Thursday, December 25, 2008
My best friend and I had this bread last Winter at Babycakes NYC, an awesome little bakery in New York City that specializes in allergen-free treats. It is moist and yummy and tastes like an ooey-gooey cinnamon roll.
1/2 cup canola oil, plus more for pan
1 cup garbanzo and fava bean flour
1/2 cup potato starch
1/4 cup arrowroot
1 1/4 cups unrefined sugar, separated
2 1/4 teaspoons baking powder
1/4 teaspoon baking soda
1 teaspoon salt
1/2 teaspoon xanthan gum
2 tablespoons ground cinnamon, separated
1/3 cup store-bought unsweetened applesauce
1 cup hot water
1 cup garbanzo and fava bean flour
1/2 cup potato starch
1/4 cup arrowroot
1 1/4 cups unrefined sugar, separated
2 1/4 teaspoons baking powder
1/4 teaspoon baking soda
1 teaspoon salt
1/2 teaspoon xanthan gum
2 tablespoons ground cinnamon, separated
1/3 cup store-bought unsweetened applesauce
1 cup hot water
Preheat oven to 325 degrees. Brush a 6 3/4-by-4 1/4-by-2 3/4-inch loaf pan with oil; set aside.
In a large bowl, whisk together flour, potato starch, arrowroot, 1 cup sugar, baking powder, baking soda, salt, xanthan gum, and 1 tablespoon cinnamon.
In a medium bowl, stir together oil, applesauce, and 1 cup hot water. Add oil mixture to flour mixture; stir until well combined.
Measure out 1/3 cup of batter and place in a small bowl. Pour remaining batter into prepared loaf pan. Stir remaining 1/4 cup sugar and 1 tablespoon cinnamon into reserved batter. Add to loaf pan, swirling to combine.
Transfer to oven and bake about 35 - 45 minutes or until done and golden brown. Let cool completely on a wire rack before unmolding.
Posted by Monica at 2:09 PM 0 comments
Labels: Gluten-Free Dairy-Free Soy-Free Nut-Free, Quick Breads, Vegan