
January Daring Bakers' Challenge: Tuiles!

Thursday, January 29, 2009
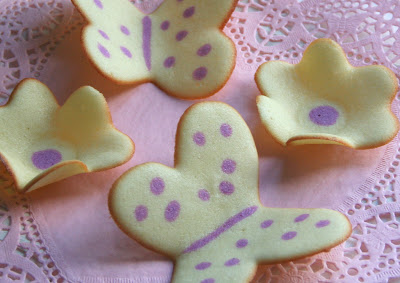
This month's challenge is from Karen of Bake My Day and Zorra of 1x umruehren bitte aka Kochtopf. They have chosen Tuiles from The Chocolate Book by Angélique Schmeink and Nougatine and Chocolate Tuiles from Michel Roux.
I chose butterflies and flowers and I made a Raspberry White Chocolate Mousse to go with them. I loved the Tuiles. They were really fun to make. I will definately make them again.

Tuiles from “The Chocolate Book”, written by female Dutch Master chef Angélique Schmeinck.

The name 'tuile' is a french word meaning 'tile,' and when presented in rows are supposed to resemble the curved tiles on the tops of buildings. In their traditional form, a tuile (petit four style cookie) is a flat cookie which has been set over a curved surface while freshly baked and allowed to cool, giving its characteristic curved-tile shape.

Recipe:
Yields: 20 small butterflies or shape of choice or 6 large Preparation time batter 10 minutes, waiting time 30 minutes, baking time: 5-10 minutes per batch

65 grams / ¼ cup / 2.3 ounces softened butter (not melted but soft)
60 grams / ½ cup / 2.1 ounces sifted confectioner’s sugar
1 sachet vanilla sugar (7 grams or substitute with a dash of vanilla extract)
2 large egg whites (slightly whisked with a fork)
65 grams / 1/2 cup / 2.3 ounces sifted all purpose flour
1 table spoon cocoa powder/or food coloring of choice ( I used India Natural Dyes)
Butter/spray to grease baking sheet or SILPAT

Oven: 180C / 350F

Using a hand whisk or a stand mixer fitted with the paddle (low speed) and cream butter, sugar and vanilla to a paste. Keep stirring while you gradually add the egg whites. Continue to add the flour in small batches and stir to achieve a homogeneous and smooth batter/paste. Be careful to not over mix.

Cover the bowl with plastic wrap and chill in the fridge for at least 30 minutes to firm up. (This batter will keep in the fridge for up to a week, take it out 30 minutes before you plan to use it).

Line a baking sheet with parchment paper or Silpat, grease with either butter/spray and chill in the fridge for at least 15 minutes. This will help spread the batter more easily if using a stencil/cardboard template such as the butterfly. Press the stencil on the baking sheet and use an off sided spatula to spread batter. Leave some room in between your shapes.

I used some cardboard cake rounds I had to make my stencils.

Mix a small part of the batter with the cocoa and a few drops of warm water or food coloring until evenly colored. Use this colored batter in a paper piping bag and proceed to pipe decorations on the wings and body of the butterfly.

Bake butterflies in a preheated oven (180C/350F) for about 5-10 minutes or until the edges turn golden brown. Immediately release from baking sheet and proceed to shape/bend the cookies in the desired shape. These cookies have to be shaped when still warm, you might want to bake a small amount at a time. Or: place a baking sheet toward the front of the warm oven, leaving the door half open. The warmth will keep the cookies malleable. If you don’t want to do stencil shapes, you might want to transfer the batter into a piping bag fitted with a small plain tip. Pipe the desired shapes and bake. Shape immediately after baking using for instance a rolling pin, a broom handle, cups, cones….


RASPBERRY WHITE CHOCOLATE MOUSSE

Raspberry White Chocolate Mousse
INGREDIENTS:
1 (10 ounce) package frozen raspberries,
thawed
2 tablespoons white sugar
2 tablespoons orange liqueur
1 3/4 cups heavy whipping cream
6 ounces white chocolate, chopped

DIRECTIONS:1.Process berries in a blender or food processor until smooth. Strain mixture into a small bowl, and discard seeds. Add the sugar and liqueur, and stir until sugar dissolves. Makes 1 cup of sauce.

2.In a heavy saucepan on low heat, warm 1/4 cup of the cream and the white chocolate, stirring constantly until chocolate melts. Let mixture cool until it is lukewarm. Stir in 1 Tablespoon of the raspberry sauce (or more) and transfer to a large bowl.

3.In a medium bowl, whip remaining 1 1/2 cup cream to soft peaks. Fold into melted chocolate mixture, one-third at a time, until no streaks remain.

4. Combine together OR layer into parfait dishes, and serve with the sauce. May also be used to fill or ice a cake

Pear Torte

Tuesday, January 6, 2009

Gluten-Free Vegan Pear Torte

This recipe is from The Gluten-Free Vegan cookbook by Susan O'Brian.  Every recipe I've tried from her cookbook has turned out great.  This torte was delicious. I made it for New Year's Eve and everyone loved it, allergy-sensitive and not. I used Comice pears.

Pear Torte
(The Gluten-Free Vegan by Susan O’Brien)


Crust½ Cup Vegan Margarine
1/3 Cup Agave Nectar
¼ teaspoon Vanilla Extract
¾ cup Sorghum Flour
2/3 cup Chopped Walnuts

Filling
1 (8-ounce) Tub Tofutti Soy Cream Cheese
1 Tablespoon Tofutti Soy Sour Cream
1 Egg or 1 ½ Teaspoons Ener-G Egg Replacer whisked together with 2 Tablespoons Warm Water
½ Teaspoon Vanilla Extract
1/8 Cup Agave Nectar
1 Pound Pears, peeled, cored and sliced
Ground Cinnamon, for sprinkling

Preheat the oven to 350 degrees F. Lightly grease a 9-inch square baking pan or dish or (I used my quiche plate) with vegetable oil.

Prepare the crust: Beat the margarine with the agave nectar until creamy. Add the rest of the crust ingredients. Stir to blend together well. Spread in the prepared pan and bake for 15-18 minutes, or until set. Let cool while you make the filling.

For the filling: In a large mixing bowl, beat all the filling ingredients together (except the pears and cinnamon) until well blended. Pour over the cooled crust. Arrange the sliced pears on top of the filling. Sprinkle generously with cinnamon.

Bake at 350 degrees until set, 20 to 30 minutes. Cool on wire rack. Store in refridgerator after cooled. Tastes just a great or better the next day.

Allergen-Free Cinnamon Toasty Bread

Thursday, December 25, 2008

Allergen-Free Cinnamon Toasty Bread
My best friend and I had this bread last Winter at Babycakes NYC, an awesome little bakery in New York City that specializes in allergen-free treats. It is moist and yummy and tastes like an ooey-gooey cinnamon roll.

1/2 cup canola oil, plus more for pan
1 cup garbanzo and fava bean flour
1/2 cup potato starch
1/4 cup arrowroot
1 1/4 cups unrefined sugar, separated
2 1/4 teaspoons baking powder
1/4 teaspoon baking soda
1 teaspoon salt
1/2 teaspoon xanthan gum
2 tablespoons ground cinnamon, separated
1/3 cup store-bought unsweetened applesauce
1 cup hot water

Preheat oven to 325 degrees. Brush a 6 3/4-by-4 1/4-by-2 3/4-inch loaf pan with oil; set aside.

In a large bowl, whisk together flour, potato starch, arrowroot, 1 cup sugar, baking powder, baking soda, salt, xanthan gum, and 1 tablespoon cinnamon.

In a medium bowl, stir together oil, applesauce, and 1 cup hot water. Add oil mixture to flour mixture; stir until well combined.

Measure out 1/3 cup of batter and place in a small bowl. Pour remaining batter into prepared loaf pan. Stir remaining 1/4 cup sugar and 1 tablespoon cinnamon into reserved batter. Add to loaf pan, swirling to combine.

Transfer to oven and bake about 35 - 45 minutes or until done and golden brown. Let cool completely on a wire rack before unmolding.

Happy Holidays!

Sunday, December 21, 2008

Happy Holidays !

Allergen-Free Banana Bread

Friday, November 21, 2008


This banana bread is our favorite!

Allergen-Free Banana Bread
(Adapted from Special Diet Solutions by Carol Fenster, PhD.)

INGREDIENTS:1/3 cup Canola Oil
2/3 cup Brown Sugar, packed
2 large Eggs
1 tsp. Vanilla
1-3/4 cups Gluten Free All Purpose Baking Flour
2 tsp. Baking Powder
1-1/4 tsp. Cinnamon
1 tsp. Xanthan Gum
1/2 tsp. Salt
1-1/2 cups Banana, mashed
1/2 cup Chocolate Chips, Pecans or Walnuts, chopped (Optional)
1/2 cup Raisins (Optional)

Preheat oven to 350°F. Grease 9x5-inch non-stick loaf pan. Cream together oil, sugar, eggs, and vanilla in large bowl with eletric mixer. Add flour, xanthan gum, salt, baking powder and cinnamon to egg mixture, alternating with bananas. Beat until smooth. Stir in nuts and raisins if using. I did not use. Batter will be somewhat soft. Transfer to pan. Bake for 1 hour.


Allergen-Free Play Dough

Sunday, November 2, 2008


Allergen-Free Play Dough
(Free of Wheat & Gluten, Dairy, Soy, & Nuts)

1 Cup White Rice Flour
1 Cup Salt
1 Cup Corn Starch
4 Teaspoons Cream of Tartar
2 Teaspoons Canola Oil (vegetable oils are often soy)
2 Cups Water
Food Coloring

Combine all ingredients in a heavy sauce pan. Heat and stir over medium-low heat until a ball forms. When it starts to have a glazed appearance, it is done.

We are so excited to finally have a good allergy-free play dough recipe. I've tried other recipes with no luck and the commercial gluten-free play doughs are expensive and have super strong scents. The Childrens' Director at our church gave me this recipe and we are so happy to have it.

October Daring Bakers' Challenge - PIZZA!!

Wednesday, October 29, 2008


Gluten-Free Crimini Mushroom & Artichoke Pizza with Fresh Basil and Ciliegine Mozzarella

Gluten-Free Pizza Dough and  Crimini Mushroom & Artichoke Tomato Sauce (recipe below) topped with fresh basil, artichokes, sliced mushrooms and fresh ciliegine mozzarella.  The Crimini Mushroom and Artichoke topping was really flavorful and filling and tasted great alone without cheese as a vegan and dairy-free option.

EQUIPMENT: Stand mixer with paddle and dough hook attachments (optional, see recipe), cooking thermometer, baking sheet, parchment paper, cooking oil, plastic wrap, pizza peel/scraper, pizza stone or pan.

RECIPE SOURCE: “The Bread Baker's Apprentice: Mastering The Art of Extraordinary Bread” by Peter Reinhart. Ten Speed Press, Berkeley, CA. Copyright 2001. ISBN-10: 1-58008-268-8, ISBN-13: 978-158008-268-6.

BASIC PIZZA DOUGH
Makes 6 pizza crusts (about 9-12 inches/23-30 cm in diameter).

Ingredients:
4 1/2 Cups (20 1/4 ounces/607.5 g) Unbleached high-gluten (%14) bread flour or all purpose flour, chilled
FOR GF: 4 ½ cups GF Flour Blend with 2 tsp xanthan gum or 1 cup brown rice flour, 1 cup corn flour, 1 cup oat flour, 1 ½ cup arrowroot, potato or tapioca starch + 2 tsp xanthan or guar gum
1 3/4 Tsp Salt
1 Tsp Instant yeast - FOR GF use 2 tsp
1/4 Cup (2 ounces/60g) Olive oil or vegetable oil
1 3/4 Cups (14 ounces/420g or 420ml) Water, ice cold (40° F/4.5° C)
1 Tb sugar - FOR GF use agave syrup
Semolina/durum flour or cornmeal for dusting

DAY ONE
Method:

1. Mix together the flour, salt and instant yeast in a big bowl (or in the bowl of your stand mixer).

2. Add the oil, sugar and cold water and mix well (with the help of a large wooden spoon or with the paddle attachment, on low speed) in order to form a sticky ball of dough. On a clean surface, knead for about 5-7 minutes, until the dough is smooth and the ingredients are homogeneously distributed. If it is too wet, add a little flour (not too much, though) and if it is too dry add 1 or 2 teaspoons extra water.NOTE: If you are using an electric mixer, switch to the dough hook and mix on medium speed for the same amount of time.The dough should clear the sides of the bowl but stick to the bottom of the bowl. If the dough is too wet, sprinkle in a little more flour, so that it clears the sides. If, on the contrary, it clears the bottom of the bowl, dribble in a teaspoon or two of cold water.The finished dough should be springy, elastic, and sticky, not just tacky, and register 50°-55° F/10°-13° C.

Or

2. FOR GF: Add the oil, sugar or agave syrup and cold water, then mix well (with the help of a large wooden spoon or with the paddle attachment, on low speed) in order to form a sticky ball of dough.

3. Flour a work surface or counter. Line a jelly pan with baking paper/parchment. Lightly oil the paper.

4. With the help of a metal or plastic dough scraper, cut the dough into 6 equal pieces (or larger if you want to make larger pizzas). NOTE: To avoid the dough from sticking to the scraper, dip the scraper into water between cuts.

5. Sprinkle some flour over the dough. Make sure your hands are dry and then flour them. Gently round each piece into a ball. NOTE: If the dough sticks to your hands, then dip your hands into the flour again.

6. Transfer the dough balls to the lined jelly pan and mist them generously with spray oil. Slip the pan into plastic bag or enclose in plastic food wrap.

7. Put the pan into the refrigerator and let the dough rest overnight or for up to thee days. NOTE: You can store the dough balls in a zippered freezer bag if you want to save some of the dough for any future baking. In that case, pour some oil(a few tablespooons only) in a medium bowl and dip each dough ball into the oil, so that it is completely covered in oil. Then put each ball into a separate bag. Store the bags in the freezer for no longer than 3 months. The day before you plan to make pizza, remember to transfer the dough balls from the freezer to the refrigerator.

DAY TWO
8. On the day you plan to eat pizza, exactly 2 hours before you make it, remove the desired number of dough balls from the refrigerator. Dust the counter with flour and spray lightly with oil. Place the dough balls on a floured surface and sprinkle them with flour. Dust your hands with flour and delicately press the dough into disks about 1/2 inch/1.3 cm thick and 5 inches/12.7 cm in diameter. Sprinkle with flour and mist with oil. Loosely cover the dough rounds with plastic wrap and then allow to rest for 2 hours.

Or

8. FOR GF: On the day you plan to eat pizza, exactly 2 hours before you make it, remove the number of desired dough balls from the refrigerator. Place on a sheet of parchment paper and sprinkle with a gluten free flour. Delicately press the dough into disks about ½ inch/1.3 cm thick and 5 inches/12.7 cm in diameter. Sprinkle the dough with flour, mist it again with spray oil. Lightly cover the dough round with a sheet of parchment paper and allow to rest for 2 hours.

9. At least 45 minutes before making the pizza, place a baking stone on the lower third of the oven. Preheat the oven as hot as possible (500° F/260° C). NOTE: If you do not have a baking stone, then use the back of a jelly pan. Do not preheat the pan.

10. Generously sprinkle the back of a jelly pan with semolina/durum flour or cornmeal. Flour your hands (palms, backs and knuckles). Take 1 piece of dough by lifting it with a pastry scraper. Lay the dough across your fists in a very delicate way and carefully stretch it by bouncing it in a circular motion on your hands, and by giving it a little stretch with each bounce. Once the dough has expanded outward, move to a full toss. During the tossing process, if the dough tends to stick to your hands, lay it down on the floured counter and reflour your hands, then continue the tossing and shaping. In case you would be having trouble tossing the dough or if the dough never wants to expand and always springs back, let it rest for approximately 5-20 minutes in order for the gluten to relax fully,then try again.You can also resort to using a rolling pin, although it isn’t as effective as the toss method.

Or

10. FOR GF: Press the dough into the shape you want (about 9-12 inches/23-30 cm in diameter - for a 6 ounces/180g piece of dough). NOTE: Make only one pizza at a time.

11. When the dough has the shape you want (about 9-12 inches/23-30 cm in diameter - for a 6 ounces/180g piece of dough), place it on the back of the jelly pan, making sure there is enough semolina/durum flour or cornmeal to allow it to slide and not stick to the pan.

12. Lightly top it with sweet or savory toppings of your choice.

13. Slide the garnished pizza onto the stone in the oven or bake directly on the jelly pan. Close the door and bake for about 5-8 minutes.

Or

13. FOR GF: Place the garnished pizza on the parchment paper onto the stone in the oven or bake directly on the jelly pan. Close the door and bake for about 5-8 minutes. NOTE: Remember that the best pizzas are topped not too generously. No more than 3 or 4 toppings (including sauce and cheese) are sufficient.

NOTE: After 2 minutes baking, take a peek. For an even baking, rotate 180°.If the top gets done before the bottom, you will need to move the stone or jelly pane to a lower shelf before the next round. On the contrary, if the bottom crisps before the cheese caramelizes, then you will need to raise the stone or jelly.

14. Take the pizza out of the oven and transfer it to a cutting board or your plate. In order to allow the cheese to set a little, wait 3-5 minutes before slicing or serving. Scrumptious!!!


Crimini Mushroom and Artichoke Pizza Sauce

2 TBLS Olive Oil
½ Cup Chopped Shallots
4 Cloves Garlic, Chopped
2 Cups or an 8 oz package of Cleaned and Sliced Organic Crimini Mushrooms (save a few out to put on top of pizza)
1/3 Cup Chopped Artichokes plus more for topping the pizza
3-4 Tablespoons Chopped Fresh Basil plus more for topping the pizza when it comes out of the oven
1 (8 oz) Can Tomato Sauce
Freshly Ground Pepper

In a large Skillet, heat the olive oil over medium-high heat. Add the shallots and sauté until soft. Add the garlic and mushrooms. Continue to sauté until the mushrooms are soft, 4-5 minutes. Add the artichokes and basil. Add the tomato sauce. Stir to mix well and simmer a few minutes. Season to taste with pepper.